Magistra Nicolaa de Bracton
Materials needed: Dowel, thread (perle
cotton, DMC, or a plied silk all work well; amount needed will depend on gauge
of mesh; if you use the suggested size stick, I would recommend getting about 50
meters of thread), fine gauge netting needles or a substitute, (fine gauge
netting needles (I suggest the sizes between 5"-8" for this scale) are
available from Lacis, at www.lacis.com.; or
you can substitute anything from sticks to cotter pins), gauge stick (I cut mine
out of old credit cards; 3/8" to 1/2" wide is a good starting point).
First, prepare your netting needle or substitute by loading it
with thread. If you're using a real netting needle, wind the thread parallel to
the long "stem" between the two prongs. If you're using a substitute,
wind the thread around it. Make sure not to put on too much thread, since the
needle has to fit through the hole of your mesh.
To begin your net, you will need to get your thread mounted on
a dowel. (You can also use a piece of cording stretched tight for a foundation
cord).
This is the basic double half-hitch knot used to mount the netting thread on the
dowel.
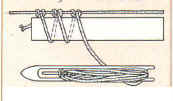
The gauge stick is used to create the first row of loops. To
get an average-sized hair net using the gauge stick provided, you will need to
tie about 40 double half-hitch knots.

Your first row of loops will look like this. To start the next
row, position the gauge stick as shown and begin. You will want to keep several
completed loops on the gauge stick to assure uniformity in loop size (for a
nice, even mesh.)
(These diagrams are from J. Brittain, The Step-by-Step
Needlecraft Encyclopedia New York: Crescent Books, 1995).
Finally, tape your dowel to a chair or side of a table so that
it hangs down in a U shape. You will initially probably want to flip over the
dowel at the beginning of each new row.
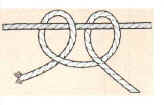
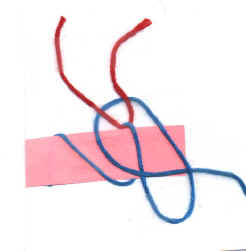
The netting knot is also known as a mesh knot or sheet bend.
Here’s how it is worked:
Figure 1. The thread is brought around the back of the card
and through the top loop,
Figure 2. A loop of blue thread is held in place from the back
while the thread passes behind the top loop.
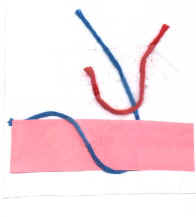
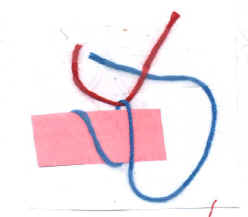
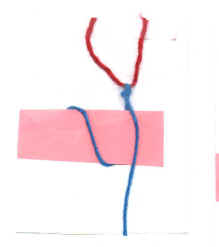
Figure 3. The knot is tied by bringing the thread to the front
of the top loop and passing it through the loop held in place.
Figure 4. Knot when pulled tight.
Try to keep an even tension on the working thread as you tie
your knots. Holding the bottom loop close with your finger should help keep the
working thread tight close to the gauge stick and help avoid baggy loops.
When you run out of thread, simply tie on a new piece. If you
plan carefully, you can position the knot close to one of the netting knots.
If you use a 3/8" gauge stick, you should need about 25
rows of mesh for a close-fitting hair net. If you have very long or thick hair,
you may wish to add a couple more rows. For future reference, a smaller gauge stick will produce a finer mesh. If you halve the size of the mesh, you will
need to double the number of foundation knots; you will also need to add more
rows of mesh (although probably not so many as double).
When you are ready to finish your net, take a length of thread
and run it through the top row of loops, just under the mounting knots. Now,
carefully remove the net from the dowel. Join the two sides of the net by
running another thread (perhaps left over from your last mesh knot) up through
the side holes, tying a slip knot every few holes, and tying off when you reach
the top. This will give you a "tube" of net. Now, take the string that
you ran through the top loops, pull it tight, and tie it securely. This is the
crown of your net.
The edges of the nets found in period finds were edged with
finger-woven braid or tablet-woven braid. You could use commercially purchased
braid or ribbon as an alternate. In the period examples, the net was sewn to the
braid, but you could alternately run a "drawstring" of ribbon or cord
through the bottom row of netting.
Some pictures of a
hairnet made by this method
Hairnets such as the one on the next page have been found in
archaeological digs and gravesites dating from the 13th century
onwards in Germany and England (and possibly other locations I am not aware of).
Contemporary illustrations from these two countries show that the hair net was
an important fashion accessory. When it is seen in illumination, it is often
worn with a wimple/barbette and fillet. The extant hairnets were made from silk
and edged with bands of either finger-weaving or tablet-weaving. The gauge on
these nets could be extremely fine; the example on the next page is at the upper
end of the scale. The nets could either be worked as a square or in the round.
It is quite likely that this technique was also used to make hair nets in later
periods as well.
What to call these nets? Nets or cauls seem to be the words
used in period. The word "snood" used referring to a hairnet is a 20th
century misunderstanding; a snood originally was a type of hair ribbon.
The netmaking
process, from Crowfoot et. al. Textiles and Clothing c. 1150—c.1450. London:
HMSO, 1992
 Left:
St. John’s College, Cambridge Ms K 26 f.231 (1270-80) shows the highly
fashionable hairnet, barbette, and fillet on the serpent which tempts Adam and
Eve (a good clue that this was considered a fashionable style in this period).
Left:
St. John’s College, Cambridge Ms K 26 f.231 (1270-80) shows the highly
fashionable hairnet, barbette, and fillet on the serpent which tempts Adam and
Eve (a good clue that this was considered a fashionable style in this period).
A 14th century mesh hairnet, reproduced at scale
(Crowfoot et al, Textiles and Clothing). The basic construction did not
change from the 13th to the 14th century.
Copyright 1998, Susan Carroll-Clark. All rights reserved.
![]()
|
|
|